Stripe onboarding/config Step 1
The red color indicates that you have a stripe account (Step 1 from onboarding to stripe) but needs to connect to our stripe account for automatic and safe money transfer.
Now Click simply on “Finnish your Stripe onboarding”
Details about stripe connect here : https://support.stripe.com/topics/connect
Stripe onboarding/config Step 2
INow you see the Stripe flow.
Create your password. (in red more than 10 characters please!)
Remark : ! Do not change the email here or if you want to give us an call to help you!
Then you need to configure 2 factor authentication (We suggest Google Authenticator)
So get your Smartphone ready and have Google Authenticator installed.
Easiest is using the camera and QR-code to get first code.


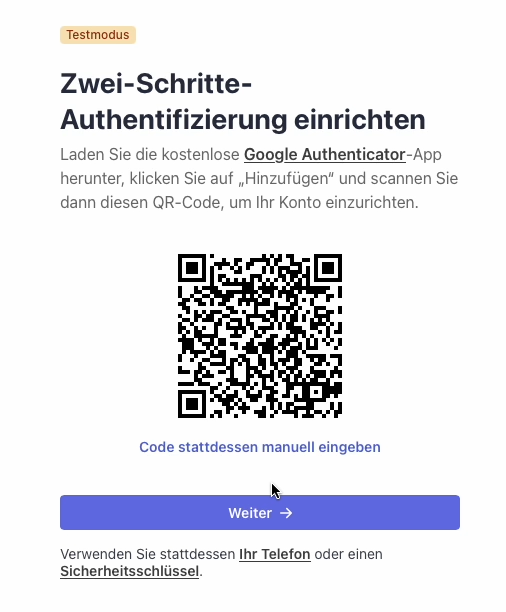
Stripe onboarding/config step 3
Use GoogleAuthenticator (or other method you have chosen)
And enter the verify code as you see in picture.
Now safe the securecode (download or write it down).
As you need this code to reconfigure the 2 factor authentication after your mobile is lost for instance.
If you click next you are guided to your company stripe configuration.
Stripe onboarding/config step 4
Now you have to choose your country and which type of company you are.
Depending on the type you have to enter some data of your company.
Like if you are an ltd name of other shareholders etc.
Stripe onboarding/config step 5
Now you have to enter your legal first name and legal last name (same as on your tax papers)
if you are an one person company then your date of birth (like in our example)
And then your Adress and telephone number. This number is where the stripe team will call you if something is to be discussed.
then click
next.
This data you can change anytime in your stripe portal access.
Stripe onboarding/config step 6
Now you have to enter all company relevant data.
UID Number (if it applies for your business)
The industry is necessary as it is mandatory that you “let” stripe calculate your taxes.
if you have an existing page you can enter it here if not you can later enter your makeronline.shop page here.
the productdesciption helps the stripe team and can be used later.
Now hit next button
Stripe onboarding/config step 7
Here you choose your bank and your bank account (in testy stem we use test account).
We never get your bank data. All transactions from your customers to stripe and to your account are controlled by this settings. When your backdate is entered stripe guarantees bank level security. Now you have to choose payout cadence.
You can change that anytime by using stripe portal.
Please read all information of stripe (especially payouts and slip payments ) in details.
Now press next button
Stripe onboarding/config step 8
Now stripe needs public details for your customers.
you can choose text of your charge (5-22 characters)
and you can choose an short product text as well.
and an customer support telephone number.
you can choose if you want to show it on payment slips of your customers.
it will be used in dispute cases.
And now press next button.
Stripe onboarding/config step 9
Stripe has a Stripe climate initiative you can choose here if you support it or not.
For educational purposes we have chosen No here.
Stripe onboarding/config step 10
Our system and your automatic generated bills need an propper setting here.
And you must set “Use Stripe Tax” to YES .
Stripe onboarding/config step 11
Now stripe shows you all collected data for you to verify.
please check and correct errors.
If you are happy Press “accept and send”
Now you are ready for entering products to sell. (handbook products)
Stripe onboarding/config step 12
Now you are ready to go.
The system shows you your makeronline.shop named New Project and in Status unpublished. Shop indicates that it is not an exhibition.
Remark : In top menu you see the Go to Stripe link. Use that anytime to go into your Stripe dashboard to see new orders payments change settings.
Now we propose to first add products and (or the other way around) then adjust the project your makeronline shop. All of your products which are active will be shown due to your settings in makeronline.shop.


